Wednesday, February 27, 2013

Great homes come to dogs who wait!

Last night the moment I had prayed about for many months, finally happened.  Marty found his forever home.  Marty was the last of the "Maplewood 6 Pack" to find his home, but good homes come to dogs who wait!  Of any dog I have ever fostered, I think I have worried the most about this boy.  Marty is not a normal dog due to his previous situation, however he is a deserving dog and I can tell he is going to recover brilliantly under the loving care of his new family.  I am so happy!

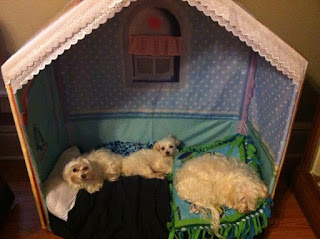
Marty and his new sister.  How cute are they?!

I had no doubts last night when Marty left that he was going to a family that was going to give him a chance to succeed, a chance to be a real dog, and a chance at the new life that he was promised the day he left the puppymill.  When I drove home last night I cried the entire road home.  Not because I was sad, but because I was humbled yet again by God and His plan.  I was again reminded that if I pray about something and let God handle it in His time, the ultimate solution will unfold.  The truth is right here in the pictures.....

Marty (middle) and his new siblings on their first day together.

Reminder:  Don't forget to enter our contest hosted by our sponsor: Skin Soap Co.  See blog post  http://ontheurbanfarm.blogspot.com/2013/02/sponsor-welcome-skin-soap-co.html for details!

Sunday, February 24, 2013

My little pony....


Saturday we went over to Millennium Quarter Horses so Katzya could take her riding lesson.  When we got there, Tammy (the owner) showed me a little pony she had for sale.  I tell you it was the cutest damn thing I had ever seen!  I was talking to the pony while he was in his stall, and asked Tammy if I could get him out and take him for a walk.  I am not big on riding horses because I am just old enough to be a little afraid of them, and they sense it.  I do love to brush them, feed them, and clean stalls though.  I just find it comforting to be around horses, I don't have to ride them to enjoy them.  With that being said, I do sort of like to ride.

Well, as I was talking to the pony, Tammy says: "You should ride him!  He is real fun!"  I sort of looked at Tammy like she had two heads, and had to explain to her that I weight 220 pounds!  (Normally, I would never admit this, however I felt I had to come clean this time because this little pony's life depended on it!)  In my head, all I could picture was me on this little pony's back, and him laying splay legged on the ground, collapsed from my body weight.  Certainly, she could not be serious about me riding this pony?!  

Oh, Tammy was serious all right!  She got the little pony out, saddled him up for me and I wasn't afraid to ride him one bit!  He was so short (and I trust Tammy would never put me on a horse that would kill me...), that my fears were no more.  I figured if this little pony threw me off then I wouldn't have very far to fall!  I was surprised by how fast he was, and it was a blast.  


Below is me and Cheez-It the pony posing for our victory photo.  Neither me or the pony died during the ride, and I am impressed by how strong and sturdy these little guys are.  This little pony acted like it was not big deal to tote me around the arena.  He made it look effortless, and he was fast!  

I tell you if I could own another horse right now, there is no doubt in my mind I would finally buy myself the pony I had always dreamt about having as a child.  I think Cheez-It and I look pretty good together!

Remember if you haven't done so, sign up for our giveway!  See http://ontheurbanfarm.blogspot.com/2013/02/sponsor-welcome-skin-soap-co.html for more information...


This post has been shared with my friends on:


Sponsor: Welcome Skin Soap Co.


Fine, homemade products are important to us, and because of that On the Urban Farm would like to introduce you to our newest sponsor: Skin Soap Co.  We believe in supporting local businesses, and standing behind quality products, especially ones that are made with natural ingredients.  We found all of this in the Skin Soap Co.  From cold-press soaps to lip balm and laundry soap, these products are amazing!  

In November I contacted Skin Soap Co. because my daughter was celebrating her 13th birthday and the theme was cupcakes.  I asked Leah Hampshire (owner) if she could make soap in the shape of a cupcake that we could hand out as party favors.  The result was absolutely brilliant!  Leah made cupcake soap that was the hit of my daughter's party.  Every last detail down to the glitter frosting was perfect.  I  am so happy to have her as a sponsor of this blog!  Please support  this local business owner and her products by spreading the word about her and her business.  


Can you tell us about the products you produce?

I make cold process soap using traditional methods.  My soaps are vegetarian or vegan, made with olive oil, coconut oil, palm oil, distilled water, either organic milk or Snowville Creamery grass-fed Ohio dairy milk, sodium hydroxide (lye), castor oil, sweet almond oil, and pigments, oxides, herbs, or spices.  I use either pure essential oils for scenting, or phosphate-free and nitro musk-free fragrance oils.  My bars are 95-100% natural, and I use some organic ingredients as well.  In addition, close to 100% of the raw, wholesale supplies that I buy come from Ohio companies, with a few neighboring state products included.


What is your favorite product and why?

My favorite product is definitely cold press soap.  It's simple, beautiful, and something that everyone regardless of age or gender can use.  Plus, it's nice to remember that real soap still exists - not these chemical detergent "body washes" that are in the store and made overseas.  Real soap made with vegetable oils the way your grandmother would have known soap.


You mention that nearly all of your raw, wholesale supplies come from Ohio companies.  That is impressive!  Can you explain why buying local is important to you?  

I believe in buying local for so many reasons: the environmental impact, the support of your local community, and the support of artisans who use money for piano lessons for their kids, and not for massive business operations.  I love how unique local products are and how diverse.  They are made with a level of love and pride that you can't buy at a box store, no matter how many millions of dollars were spent on the marketing to try to convince you how unique and artisan the product is.


How long have you been making soap?

I made my first batch of olive oil soap two years ago.  A coworker who had made 3 batches of soap before, taught me how to do it one night and I spent the next 6 months researching soapmaking more before I got the nerve up to try it again.


What lead you to start your own buisness?

I wasn't really planning on starting a business.  I started making soap because it was fun and relaxing to me.  I am not very artistic, but I appreciate artisan products and I found that soapmaking allowed me to be an artisan.  Once my family members saw my soap, they loved it.  They wanted more than the bars I was giving as gifts so I started making more.  Soon I was applying for my LLC to make it official.


Are your products sold in any stores locally?  

Yes.  I have soaps, bath products, lip balms, and soy candles at Somewhere in Time in downtown Piqua, Ohio, and soaps at Posh Hair Salon, Stone's Throw Market, and Samorzjme in Troy, Ohio.


Are there any other ways for people order your products?  

Yes, I have an etsy store as well. 

http://www.etsy.com/shop/SkinSoapCo


Do you take custom orders?

Yes I do!  I also do wedding favors, baby shower, bridal shower gifts, and birthday party gifts.  People can email me at SkinSoapCo@gmail.com for more information.


Leah has graciously donated cold process soap to On the Urban Farm blog to be used in a giveaway, and one lucky person will win a bar of her cold process soap to try to for themselves.   Here is how the contest will work:

1) You will need to go to Skin Soap Co. and "like" their Facebook page.

2) Then come back here to my blog or On the Urban Farm Facebook page at http://www.facebook.com/OnTheUrbanFarm , and comment saying that you have done so. By commenting your name will be entered into a random drawing and the winner will receive a bar of cold process soap.  The winner will be drawn next Sunday.  Good luck!


Monday, February 18, 2013

How To: Cat Proof Grow Station!

Well, this project won't get any point for beauty, but it might get points for ingenuity!  Last week I posted a project that showed my readers how to make an affordable grow light station, and let me tell you it worked like a charm.  I had zinnias germination in 12 hours and tomatoes in 72 hours.  It was amazing!  The only difficult was the cats kept getting into my seedlings.  I added some foil sides to that grow station and the cats stayed out of it for the most part.  

My seedlings quickly outgrew that growing station, and I really wanted to start some different plants so I decided to move my seedlings somewhere else.  The problem was that my cats are everywhere and I needed a place to keep the seedlings safe.  It then dawned on me that you could basically make a grow station in a very large dog crate with a few modifications.  

We pulled our dog crate out of the basement and set it up in the dining room.


Then we hung our lights on chains from the inside.  (I am going to hang 1 or 2 more fixtures, but my bulb wasn't working so I need to return it tonight...)    

I then added the magic cat proof barrier to the outside of the crate.  (Magic cat proof barrier is also known as aluminium foil.)  I put this on with the shiny side facing inward toward the crate so that the light hitting the foil will reflect back in on the plants.  (My cats, which are pretty bold, HATE aluminium foil!)  

Finished product!  Happy seedlings!

If this is going to be your only grow station then I would recommend having the foil come off the sides of the light fixture, making a tent so that you can keep some of the moisture in for the seedlings in the beginning, otherwise I think my contraption is going to work like a charm until I can move these plants outdoors.  Then I will be squirrel proofing them, which is a whole different ballgame!  


Shared on the following blog hops:


Saturday, February 16, 2013

Seedling death....

They were murdered by Ms. Browning, with scissors, in the kitchen....

Thinning seedlings makes me feel terrible every year.  As a gardener you want each one to survive, so to go through and thin seedlings that you have nurtured along the way just feels wrong.  

This year, after making just a few simple changes I ended up with nearly all of my seeds germinating, so this year more than ever I had to thin otherwise I risked the seedlings starving each other for nutrients and choking each other out.  

Looking at the pile I had thinned last night made me laugh a bit, because I realized with each cut of the scissors I would hold my breath and cringe for the plants.  A bit dramatic and goofy I know, but what can I say?  I guess I feel empathy for all living things.....


Thursday, February 14, 2013

Wednesday, February 13, 2013

Protecting my heart for Valentine's Day


Tonight when I picked my daughter up, she immediately asked, "Mom, did you get that call from the school?"  I told her that I had no clue what she was talking about and she informed me that a note was found in the high school bathroom today, and it stated that: "There would be another Columbine tomorrow. 02/14/2013."  I try not to get too wrapped up in the fear and anxiety that encompasses our world, however when you hear about a threat of a shooting in your child's school system, you can't help but be a little bit on edge now days.  I am certain this threat is just something stupid that some kid wrote and left in the bathroom for someone to find.  Just a stupid joke.    

I am also just as certain that the my heart beats in two rooms in my house.  It beats in my own chest, and it beats in the chest of a beautiful young lady sleeping across the hall.  I am positive that she will not be at school tomorrow.  I can't risk it.  If her heart ever stopped beating, I fear mine would stop along with hers.  She is my life, my love, and it hurts me to even think of what would happen if she were not in my life.

I know I can't protect her from all of the evils in the world, and truthfully I am not a parent that would ever try.  But I can protect her from a possible evil tomorrow, and I will.  As I listen to the rhythmic sound of her breathing I am grateful that I have been blessed with such an amazing young lady, and I am proud to be her mom.

Happy Valentine's Day my beautiful girl!  You have had my heart from the moment you were conceived, and will until my last dying breath.  I can't imagine my life without you.  Not today, not tomorrow, not ever....   

Days as a zinnia seedling...


This year I planted a bunch of seedlings under a grow light, with the hope that a few things would sprout in 7-10 days.  I didn't have to wait long.  The zinnias started growing in 12 hrs!  Here is the photographic journey of my zinnias in their first week of life.  I thought it was pretty fantastical!

12  hours after planting

24 hours after planting

48 hours after planting

72 hours after planting

Sunday, February 10, 2013

How To: Affordable Grow Light Station


Per the groundhog we are going to have an early spring this year, and in order to get a jump start on my gardening I wanted to start seeds inside this year.  In previous years I started seeds in a portable green house but didn't always have success with the seeds starting due to the seeds molding and never sprouting.  Last week I went shopping for grow lights, and was amazed that the fixture itself was $150.00!  Discouraged I decided to try and make my own grow lights.  I came across a video on you tube (http://www.youtube.com/feed/UCptL6_qMImyW_yZwiMjQdpg) that outlined how to make a grow station at home for $30.00.  

In order to make the grow station you need the following supplies:

-  (1) T12 light fixture
- (2) fluorescent bulbs that fit a T12 fixture
- (1) 10 foot section of 1 inch PVC
- (2) 1" PVC elbows
- (2) 1" PVC T pieces

To complete the project you will need:

- A tape measure
- A hacksaw
- A marker

First cut your PVC in 7 sections.  You will need (1) 56" piece, (2) 14" pieces, and (4) 9" pieces.  Then put the pieces together like shown in the pictures and video.  Put the light bulbs in the light fixture and attach it to the PVC frame.  


I made a few changes to the project:

- Instead of using plain fluorescent light bulbs, I used actual grow bulbs.  The lumens were much higher in the grow bulbs than the fluorescent bulbs, so even thought they were a few dollars more I splurged for a few more lumens.

- I added more links to the chain that came with the fixture so that I could lower the light and make it closer to the growing medium so my seedlings would not become "leggy".

This light station is amazing and works like a charm!  It cost a bit more than $30.00.  The shop light was $9.00 more than his, and I spent and extra $10.00 on the grow bulbs, but even at $50.00 I was still well below the cost of buying a light station from the garden catalog and hydroponics store.  


This post shared on the following blog hops:


Thursday, February 7, 2013

Feeling watched?!


Tonight I was blogging when suddenly I felt as if I was being watched.  It was a creepy feeling, much like you would get if you noticed a peeping tom outside of your window.  (A common feeling if you own a herding dog!)  I glanced behind my computer screen and suddenly realized what who the creeper was....

Often times when I write, I read out loud to myself just to hear what my writing sounds like.  It took me a few minutes to realize that I had read aloud the word "walk".  It only took Chai 30 seconds to realize he wanted to go on one!  Luckily it was semi-warm out tonight so it wasn't hard to convince me to go.  We walked uptown, met up for a quick hello between friends, and headed home.  Chai was so happy to get out and enjoy a walk with me.  Guess I am not the only one with cabin fever! 


Monday, February 4, 2013

Eating healthy kills....


Tonight as I was sitting on the couch, I hear the Reluctant Farmer shuffling around in the kitchen.  After a few minutes I hear her say in a serious yet calm voice, "Uh, Emily?!  Can you come here?  I think I cut myself!"  Realizing that she was trying to play it cool, but was worried, I went into the kitchen to find her leaning over the sink with blood dripping off of her ring finger.  I immediately went to take a peek, but there was so much blood present I could not see anything!  I applied pressure to her finger for a few minutes with some gauze and then we tried again for another peek.  Fail!

I wrapped it wet to dry with gauze, put on a pressure bandage, and now we wait to see if there will be a trip to the ER in our future tonight.  I suspect it is just bleeding so bad because it is a finger tip and those always bleed terribly.  Through her tears, the Reluctant Farmer looked up at me and said, "See, eating healthy kills!  I knew I should have stuck with eating a cookie!"  Poor Reluctant Farmer.  On the bright side, she can commit whatever crime she would like to because you can't get a fingerprint off of that finger anymore!  Always looking for the glass half full option here on the farm....